26 Nov
2014

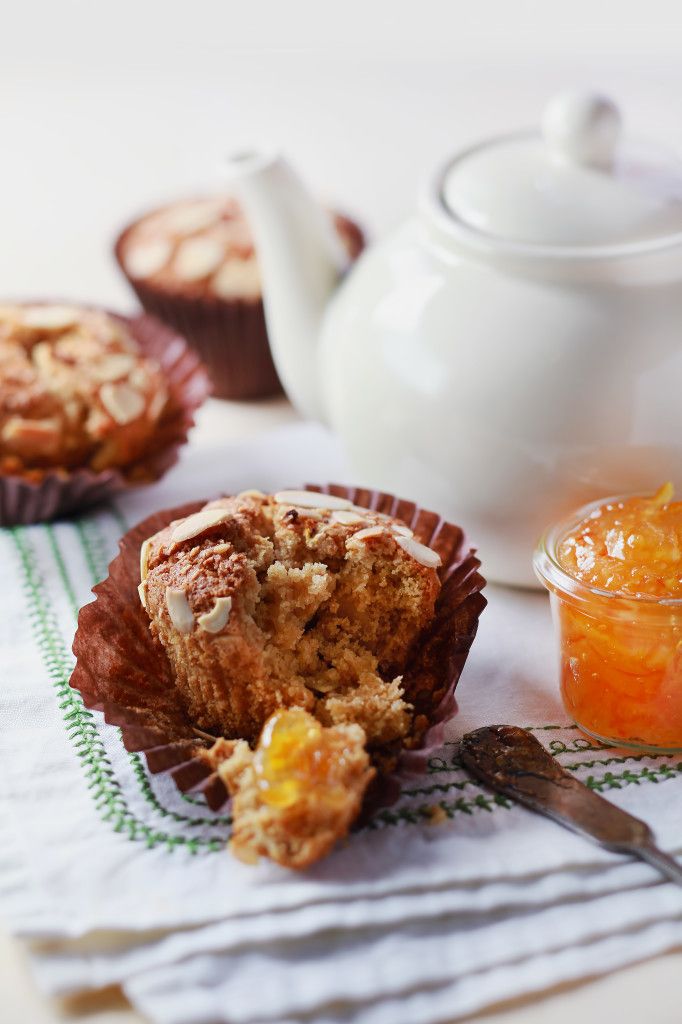
Gluten Free Muffins: Orange Almond Coconut

Delicious Gluten Free Orange Almond Coconut Muffins

These delicious gluten free muffins are an amazing dessert/snack that won’t leave you feeling bloated or tired afterwards. It’s entirely possible to make good tasting, healthy sweets!

Instead of regular white flour which is highly processed and generally unhealthy, in this recipe, we turn to a combination of brown rice flour, almond flour, and arrowroot. The flavors of orange, coconut and almond blend nicely here. Instead of refined sugar, you can use maple syrup and sucanat for a subtle backnote of sweetness.

Serve these gluten free muffins for breakfast, brunch, dessert or an afternoon snack. This recipe will yield 10 muffins.

Gluten Free Muffins Ingredients:

1 cup (177 g/6.25 oz) brown rice flour
2/3 cup (58 g/2 oz) almond flour
1/2 cup (70 g/2.46 oz) arrowroot
1/3 cup (56 g/2 oz) Sucanat
2 tsp (10 g/0.34 oz) baking powder
1/2 tsp (1.5 g/0.05 oz) kosher salt
1/3 cup (100 g/3.5 oz) maple syrup
1/2 cup (121 g/4.3 oz) orange juice
Finely grated zest of 1 orange
1 1/2 tsp (6 g/0.21 oz) vanilla extract
1/2 cup (42 g/1.5 oz) chopped almonds
1/4 cup (21 g/0.75 oz) unsweetened shredded coconut

Gluten Free Muffins Orange Almond Coconut.

Fernanda’s Gluten Free Orange Almond Coconut Muffins

Gluten Free Muffins Instructions:

Preheat oven to 375°F. Line 10 cups in a 12-cup muffin pan with paper liners, or grease them well with coconut oil.

In a large bowl, mix together the brown rice flour, almond flour, arrowroot, Sucanat, baking powder and salt. Make a well in the center, then add the maple syrup, orange juice, orange zest and vanilla. Gradually stir the dry ingredients into the wet ones, mixing just until blended. Stir in the almonds and coconut.

Spoon the batter into the prepared cups, filling them two-thirds full, and smooth the top of each muffin. Bake for 12 to 16 minutes, or until a toothpick inserted into the center of the muffins comes out clean. Cool the muffins in the pan, set on a wire rack, for at least 15 minutes before serving.

Please leave a comment in the comments section if you have any questions!

Have fun and bake with love! Enjoy 🙂

1 comment Fernanda Capobianco
16 Mar
2014

Gluten Free Banana Pancakes Recipe

Gluten Free Banana Pancakes Recipe

Are you looking for a great gluten free banana pancakes recipe? Do you enjoy eating pancakes, but not the tired, bloated, foggy feeling afterwards?  Ditch the Bisquick and try out this healthy recipe made from scratch!

gluten free banana pancakes oat flour

Gluten Free Banana Pancakes Recipe Ingredients (yields 2 medium sized pancakes):

  • 1 C. gluten free oat flour
  • 1/2 C. gluten free whole oats
  • 3 medium sized bananas
  • 1 T. chia seeds
  • 1 T. coconut palm sugar
  • dash of cinnamon
  • dash of nutmeg
  • 1/8 ~ 1/4 C. water
  • 1 T. coconut oil (instead of cooking spray)

Gluten Free Banana Pancakes Recipe Directions

  1. Mash together bananas in a large bowl.gluten free banana pancakes batter
  2. Place all dry ingredients into bowl and mix together.
  3. Add 1/8 to 1/4 C. of water to create a sticky liquid consistency.gluten free banana pancakes mixed
  4. Heat pan under medium low heat with 1 T. coconut oil.
  5. Divide the mixture in half and place each pancake onto the heated pan.gluten free banana pancakes cooking
  6. Heat each pancake for about 3 to 4 minutes.  If you burn the pancakes, don’t be upset because it gives the pancake a nice crunchy outside texture! 🙂
  7. After pancakes are cooked, eat immediately after as they are best when warm.  These healthy pancakes are so flavorful that syrup isn’t necessary.  Although, if you’re still a maple syrup fan like I am, don’t be shy 🙂  Maple syrup, raw honey, and peanut butter are all great options!


paz eating gluten free banana pancakes

Paz enjoys his first bite of gluten free banana pancakes!

These gluten free banana pancakes are delicious and I promise your tastebuds & tummy will be more than satisfied 🙂 Plus, you’ll feel lucid and ready to create an amazing day!

Remember to tell me how your gluten free banana pancakes turned out!

What other pancake alternative recipes have you tried?

Bon appétit!

3 comments Danners
26 Dec
2013

Mouthwatering Gluten Free Vegan Pizza!

Gluten Free Vegan Pizza

After my mom ate one bite of this pizza she shouted, “This is the best pizza I’ve had!!”  Not to mention, my tummy thanked me afterwards for remaining free of achy & bloated pains that occur from other fast food or frozen pizzas 🙂 Give this simple+to+make Gluten Free Vegan Pizza a whirl and I think you’ll find it just as delicious as we did!

Prep Time: 12 minutes

Cook Time: 35 minutes

Total Time: 47 minutes

Gluten Free Brown Rice Flour

gluten free 🙂

Ingredients

+brown rice flour pizza dough (2 C. brown rice flour, 1 tsp. sea salt, 2 tsp. baking powder, 1/4 C. coconut oil or olive oil, 3/4 C. water)

+tomato sauce

+nutritional yeast

+sunflower seeds

+garlic

+red onion

+spinach

+red bell pepper

+cauliflower

+broccoli

+parsley

+fresh rosemary

+black pepper

+sea salt

+cumin

+crushed red pepper

+oregano


Pizza Dough

dough rolled out on pizza stone


Lucid Practice Gluten Free Vegan Pizza

all ready for the oven!! 🙂

Instructions

1. Preheat oven to 420 degrees

2. In a medium size bowl, combine brown rice flour, salt, and baking powder.

3. Add water and oil to the mixture to create a dough consistency.

4. Lightly coat a baking sheet or pizza stone with oil (so the dough won’t stick!).

5. Plop dough onto the baking sheet/stone and spread out (working outward from the center) so that it covers the sheet.  You want the dough fairly thin (about less than 1/4 inch).

6. Place pizza in oven for 15 minutes to pre+bake.

7. Remove from oven and add tomato sauce & toppings.  I like to add the nutritional yeast, sunflower seeds, and garlic first.  Then I add the other ingredients and top it off with the other spices (rosemary, salt, pepper, cumin, crushed red pepper, oregano).  Additionally, I like to top it off with more nutritional yeast 🙂  (simply because i LOVE the taste!)

8. Pop pizza back in oven (same temp) for another 20 minutes (or until crust edges look golden brown).

9. Cut pizza and serve immediately since this pizza is tastiest when warm 🙂


**REMEMBER** the most important ingredient is: to bake with love 🙂

Enjoy and let me know how your pizza turns out!  What other gluten free doughs or recipes have you tried? 🙂

4 comments Danners